
Selenium is generally an open-source tool that is mainly used to automate Web Applications. XPath is a technique in Selenium to navigate the web elements in the HTML and XML structure of any document, and this can be used on both HTML and XML documents.
So let us start to practice Xpath with examples. First, we will see the website on which we are going to practice Xpath. We will access “https://www.geeksforgeeks.org/” for practicing Xpaths. Please follow the following steps to know how to use the chrome browser to check and practice Xpaths.
- Open Chrome browser
- Hit the URL “https://www.geeksforgeeks.org/”
- Right-click on the page opened and select the inspect option
- A tab will open on the bottom of the screen where the Elements tab will be by default selected and it will contain the Html coding of the UI of that page
- Press Ctrl+F and a text field will open at the end of the Element tab page where we will type our Xpath and check the locations of Web elements
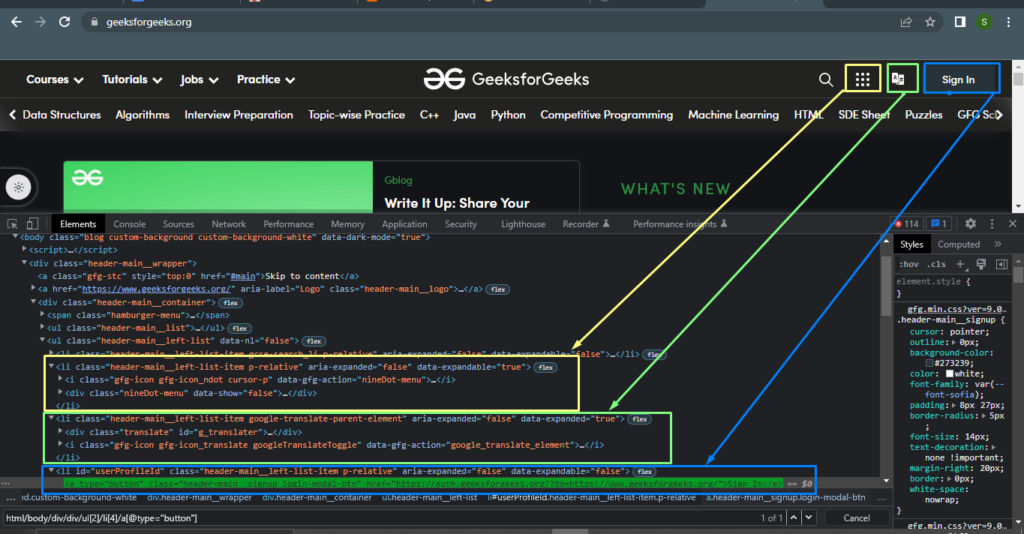
The given page will open after following the above steps where I have highlighted some web elements on which we will practice Xpath. The green highlighted area is the web element for with we have to write the Xpath that we can see at the end of the screen.
There are various ways to locate web elements through Xpath. Some of them are mentioned below:-
1. Locating Web Element Using Full/Absolute Xpath
Absolute Xpath generally starts with a root node and contains the whole path to navigate a web element. The main advantage of using absolute Xpath is that it identifies elements very fast. And the disadvantage of using them is that if any tag is removed or inserted in between, then the previously used absolute Xpath will no longer work.
Example: html/body/div/div/ul[2]/li[4]/a
The above example has the absolute path to locate the Sign In button on https://www.geeksforgeeks.org. Here, HTML is the main root node, the body is the child node of parent node Html, div is the child node of parent node body, div is the child node of parent node div, and ul[2] describes the second ul child node of parent node div, li[4] describes the fourth li child node of parent node ul[2], a describes the child node of parent node li[4].
2. Locating Web Element Using Relative Xpath
Relative Xpath is used to start the Xpath from the node of our choice, it is not required to start paths from the Root node. Relative Xpath are generally started from a Double forward slash(//).?/ basically denotes the current node.
Example: //ul[2]/li[4]/a
The above example is used to locate the Sign In button with relative Xpath on “https://www.geeksforgeeks.org/”. Here, //ul[2] describes that ul is the second child node of some other parent nodes that are not mentioned in the Xpath and we have started Xpath from some intermediate node instead of the root node. li[4] describes the fourth li child node of parent node ul[2], a describes the child node of parent node li[4].
3. Writing Xpath using @ and Attribute
If there are some uniquely recognized attributes present in some container tag then we can access those tags through attributes. The general syntax of using attributes is given below:
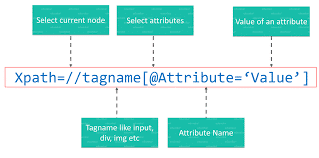
Example: //ul/li[@id='userProfileId']/a[@type='button']
Here, //ul is the current node, li[@id=’userProfileId’] is the child node of parent node //ul having attribute “id” and value of the attribute is “userProfileId” and a[@type=’button’] is the child node of parent node li[@id=’userProfileId’] and contain an attribute “type” with value “button”.
Recommend to Read:- Process Java Script Executor in Selenium Test Automation
4. Writing Xpath using last()
Suppose if a parent tag has n number of child tags and we want to locate the last child then we can use the last() Xpath function.
Example 1://ul[2]/li[last()][@id=’userProfileId’]/a
Here,//ul[2] is the current node, li[last()][@id=’userProfileId’] is the last child node of parent node ul[2] having attribute id=’userProfileId’ and a is the child node of li[last()][@id=’userProfileId’].It will locate the Sign In button.
Example 2: //ul[2]/li[last()-1][@class='header-main__left-list-item google-translate-parent-element']/i
Here, //ul[2] is the current node, li[last()-1][@class=’header-main__left-list-item google-translate-parent-element’] is the second last child node of ul[2] having attribute class=’header-main__left-list-item google-translate-parent-element’ and i is the child node of li[last()-1][@class=’header-main__left-list-item google-translate-parent-element’]. It will locate the Google translate toggle.
5. Writing XML Xpath using descendant:: keyword:
It is basically used to select all the descendant elements(children, grandchildren, etc.) of the current node.
Example://div[@class='header-main__wrapper']/descendant::li[@id="userProfileId"]/a[@type='button']
Here, //div is the current node having attribute class=’header-main__wrapper’ which have a descendant li having attribute id=”userProfileId” and a[@type=’button’] is the child node of parent node li[@id=”userProfileId”]. We don’t need to describe the in-between nodes of the div and li tag.
6. Writing Xpath using contains() Xpath function
It is used as another way to represent the attributes associated with any tag.
Example: //ul[2]/li[4]/a[contains(@type,'button')]
Here //ul[2] is the current node, .li[4] describes the fourth li child node of parent node ul[2], a describes the child node of parent node li[4] that contains an attribute ‘type’ with the value ‘button’. It will locate the Sign In button on the page.
7. Using And and Or with Xpaths
OR expression uses two conditions, whether the first condition OR second condition should be true. It is also applicable if any one of the conditions is true, or maybe both. This means that any one condition should be true to find the element.
Example: //ul[2]/li[@id='userProfileId' or @class="header-main__left-list-item google-translate-parent-element"]
Here //ul[2] is the current node and li is the child node of parent node ul[2] having either id=’userProfileId’ or class=”header-main__left-list-item google-translate-parent-element” attribute.
AND expression uses two conditions. Both conditions should be true for finding the element.
Example: //ul[2]/li[@id='userProfileId' and @class='header-main__left-list-item p-relative']/a[contains(@type,'button')]
Here //ul[2] is the current node and li is the child node of parent node ul[2] having
id=’userProfileId’ and class=’header-main__left-list-item p-relative’]/a[contains(@type,’button’)]
8. Writing Xpath using the starts-with() function
XPath starts-with() is a function used for finding the web element whose attribute value gets changed dynamically. In this method, the starting text of the attribute is matched to find the element whose attribute value changes dynamically.
Example: //ul[2]/li[@id='userProfileId']/a[starts-with(@type,'b')]
Here, It will find child node a with the attribute ‘type’ and its value starting with ‘b’
Recommend to Read:- Fetch Text from Image & PDF Using Selenium Java
9. Wildcard Character(*) in Xpath
The ‘*’ sign is used for selecting all the nodes descending from the current node.
Example: //ul[2]/*[@id='userProfileId']/a
Here, //ul[2] is the current node,*[@id=’userProfileId’] is the child node of parent node ul[2] which will select all the child nodes having attribute @id=’userProfileId’ and a is the child node of parent node *[@id=’userProfileId’].
10. Finding Elements by text()
Sometimes it may be possible that several elements may have the same Id or class values. In that case, we can use the text value of that tag to locate the web element. We can use the text() Xpath function to locate the web elements using text value.
Example: //ul/li[@id='userProfileId']/a[text()="Sign In"]
Here //ul is the current node, li[@id=’userProfileId’] is the child node of parent node //ul and a[text()=”Sign In”] is the child node of parent node li[@id=’userProfileId’] having text value “Sign In”.


