Integrate Selenium with Testrail
In this Blog, we are going to learn:
- Creating Testrun in Testrail using Selenium Java
- Updating Test Cases status in Testrun
- Adding Screenshot in testrail if any tests got failed
What Is Selenium?
Selenium is an open-source tool used to automate web applications on various browsers
What Is Webdriver?
WebDriver is an API that interacts with page elements in a more realistic way
Using Webdriver, You can design automation tests using your preferred programming language
What Is Testrail?
Testrail is a test management tool that helps to manage our test cases and test results efficiently. It tracks the results of test runs in real-time
There are two ways to update test results in Testrail using Selenium Webdriver:
- Create a TestNG Listener through which we can get test status and then call Testrail API to update test results
- Call Testrail API in the test method
Why is Integration Of Selenium Webdriver and Testrail Required?
Real-time projects mainly work on Agile methodology. We have Sprints/Iterations of one or two weeks (depending upon project needs)
Suppose We have an ongoing sprint as Sprint 10. We have already automated 100 test cases till Sprint 9.
Now we have written 20 manual test cases for Sprint 10. Once we get built for regression testing, then our code will automatically update test results for 100 automated tests once execution is completed, and for the other 20 manual test cases, the Manual QA team can execute them and can update test results in test rail manually.
Advantages of Integration of Selenium Webdriver with Testrail:
- Saves time and manual efforts are less
- Helps in streamlining QA Process
- Gives a real-time picture of the release
Steps to Integrate Selenium Webdriver with Testrail
Here we go:
- First, you need to create a test rail account (If you are using the trial version, then it will work for 14 Days)
Here is the Link to create a Testrail account
https://secure.testrail.com/customers/testrail/trial/?type=signup
- A few settings need to be done in your Testrail account
- Go to Administration – Site Settings – API. Click on Enable API Checkbox and then click on the Save settings button
- Create a new Project from the “Add Project” button on Dashboard. Enter Name and Other Details and then click on Add Project
- Add test cases to your existing project. For That, View your project – Click on the Test Cases Tab – Click On Add Test Case button. Fill in all details like Title, Preconditions, Steps, Expected Result
You can check the complete information for Testrail API below link:
https://support.testrail.com/hc/en-us/articles/7077874763156
To download Testrail Bindings with different languages, Use the below link
https://support.testrail.com/hc/en-us/categories/7076541806228-API-Manual
- From the above link, you need to select the programming language that you want to integrate with Testrail
- Click On Testrail API binding using Java (ZIP)
- Unzip and then open Java Folder. There you will get 2 files
- APIClient.java
- APIException.java
- Create a new Package Under src/main/java with the name “com”. Create a subpackage with the name “gurock.testrail”. Put these 2 files (APIClient & APIException) in that package.
- You need to use JSON simple maven dependency. You can get this dependency from the below link:
https://mvnrepository.com/artifact/com.googlecode.json-simple/json-simple
Copy the Maven dependency and then put it in the Pom.xml file of your project
- Create a new package under src/main/java/com with the name “qa.testrailmanager”. Create a class file with the name “testrailmanager.java”.
- java file will contain two methods
- addTestResults For the Test case
- addTestRun
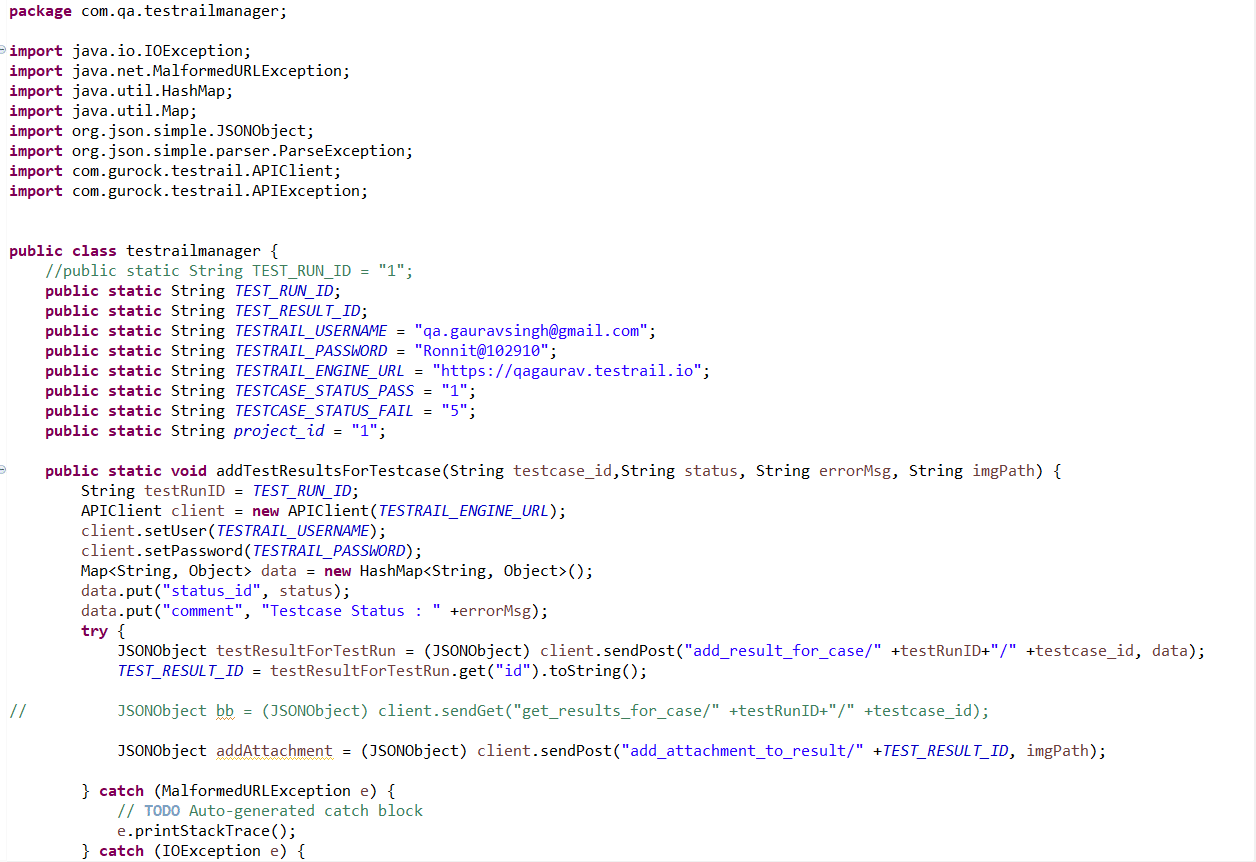
- Below is the testrailmanager.java file code
- java file will contain two methods
package com.qa.testrailmanager;
import java.io.IOException;
import java.net.MalformedURLException;
import java.util.HashMap;
import java.util.Map;
import org.json.simple.JSONObject;
import org.json.simple.parser.ParseException;
import com.gurock.testrail.APIClient;
import com.gurock.testrail.APIException;
public class testrailmanager {
            //public static String TEST_RUN_ID = "1"; (We can hard code test run ID)
            public static String TEST_RUN_ID;
            public static String TEST_RESULT_ID;
            public static String TESTRAIL_USERNAME = "qa.gauravsingh@gmail.com";
            public static String TESTRAIL_PASSWORD = "";//Please enter your own password
            public static String TESTRAIL_ENGINE_URL = "https://qagaurav.testrail.io";
            public static String TESTCASE_STATUS_PASS = "1";
            public static String TESTCASE_STATUS_FAIL = "5";
            public static String project_id = "1";
public static void addTestResultsForTestcase(String testcase_id,String status, String errorMsg, String imgPath) {
String testRunID = TEST_RUN_ID;
APIClient client = new APIClient(TESTRAIL_ENGINE_URL);
client.setUser(TESTRAIL_USERNAME);
client.setPassword(TESTRAIL_PASSWORD);
Map<String, Object> data = new HashMap<String, Object>();
data.put("status_id", status);
data.put("comment", "Testcase Status : " +errorMsg);
try {
JSONObject testResultForTestRun = (JSONObject) client.sendPost("add_result_for_case/" +testRunID+"/" +testcase_id, data);
TEST_RESULT_ID = testResultForTestRun.get("id").toString();
JSONObject addAttachment = (JSONObject) client.sendPost("add_attachment_to_result/" +TEST_RESULT_ID, imgPath);
} catch (MalformedURLException e) {
// TODO Auto-generated catch block
e.printStackTrace();
} catch (IOException e) {
// TODO Auto-generated catch block
e.printStackTrace();
} catch (APIException e) {
// TODO Auto-generated catch block
e.printStackTrace();
}
}
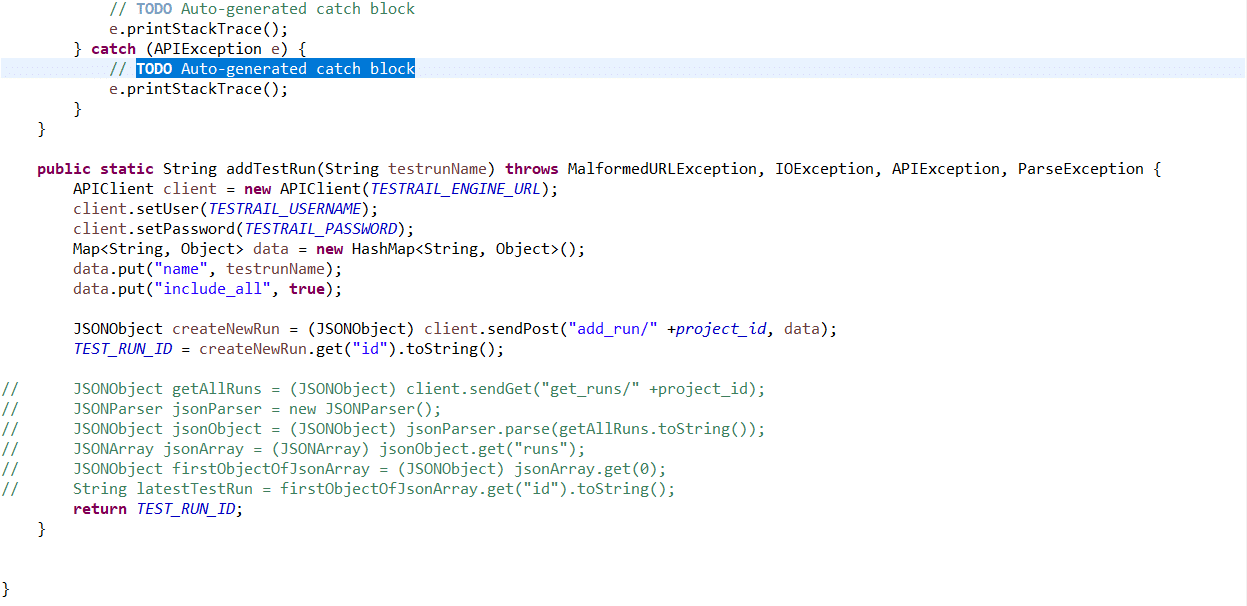
public static String addTestRun(String testrunName) throws MalformedURLException, IOException, APIException, ParseException {
APIClient client = new APIClient(TESTRAIL_ENGINE_URL);
client.setUser(TESTRAIL_USERNAME);
client.setPassword(TESTRAIL_PASSWORD);
Map<String, Object> data = new HashMap<String, Object>();
data.put("name", testrunName);
data.put("include_all", true);
JSONObject createNewRun = (JSONObject) client.sendPost("add_run/" +project_id, data);
TEST_RUN_ID = createNewRun.get("id").toString();
return TEST_RUN_ID;
}
Good to Read:- Robot Framework Integration with TestRail & TestRail CLI
- A Few Points need to be noted from the above code.
- add_result_for_case will only update the status of the test case in testrail and will also generate testResult ID
- Add_attachment_to_result will add a failed screenshot only for that TEST RESULT ID.
- Add_run will create a new test run and will also generate a testRunID which can be used in add_result_for_case
- Also, By Default, it will add all test cases to the test run. But there is also a way to add specific test cases in that test run. Please refer Testrail Documentation
- We also have methods to get testrun (“get_runs”/{project ID}) and test results (“get_results_for_case/” +testRunID+”/” +testcase_id)
- Once your account is created on testrail, then it automatically generates the test rail engine URL. Testrail Engine URL comes on your registered email address
- For Pass Status, we keep it as 1, and for fail status, we keep it as 5. Another status like skipped comes under 2,3,4
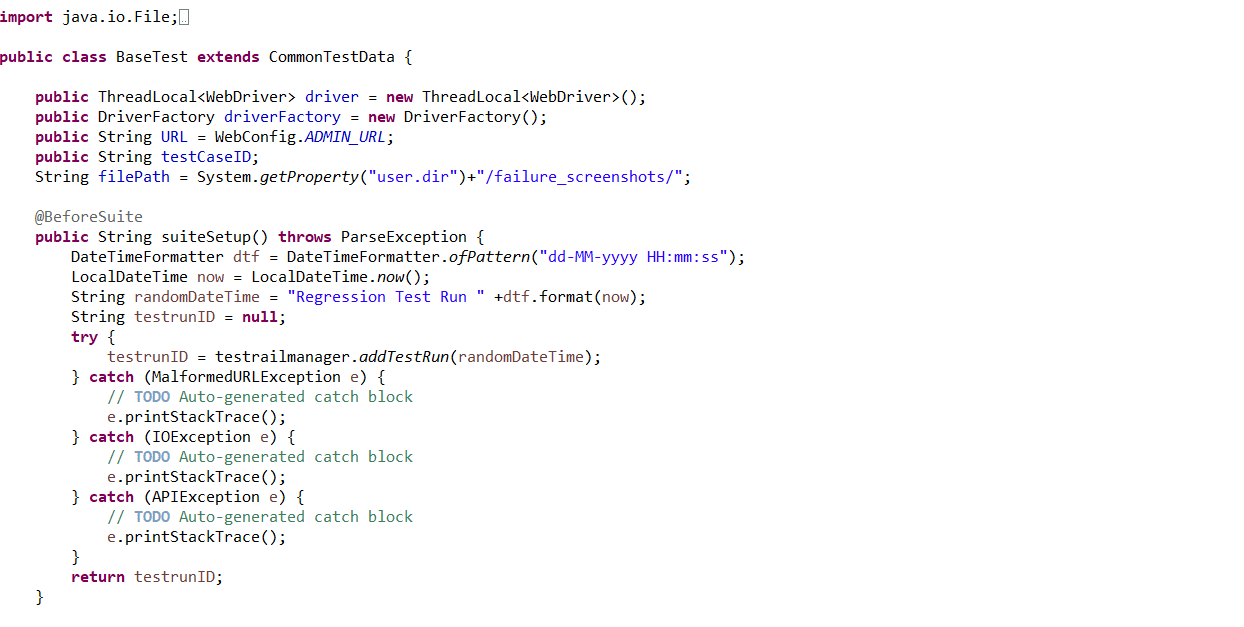
- Go into your Base Test (Where you have TestNG Annotations).In @BeforeSuiteMethod, you need to add below code:
@BeforeSuite

public String suiteSetup() throws ParseException {

 DateTimeFormatter dtf = DateTimeFormatter.ofPattern("dd-MM-yyyy HH:mm:ss");

 LocalDateTime now = LocalDateTime.now();

 String randomDateTime = "Regression Test Run " +dtf.format(now);

 String testrunID = null;

try {

            testrunID = testrailmanager.addTestRun(randomDateTime);

} catch (MalformedURLException e) {

            // TODO Auto-generated catch block

            e.printStackTrace();

} catch (IOException e) {

            // TODO Auto-generated catch block

            e.printStackTrace();

} catch (APIException e) {

            // TODO Auto-generated catch block

            e.printStackTrace();

}

            return testrunID;

}
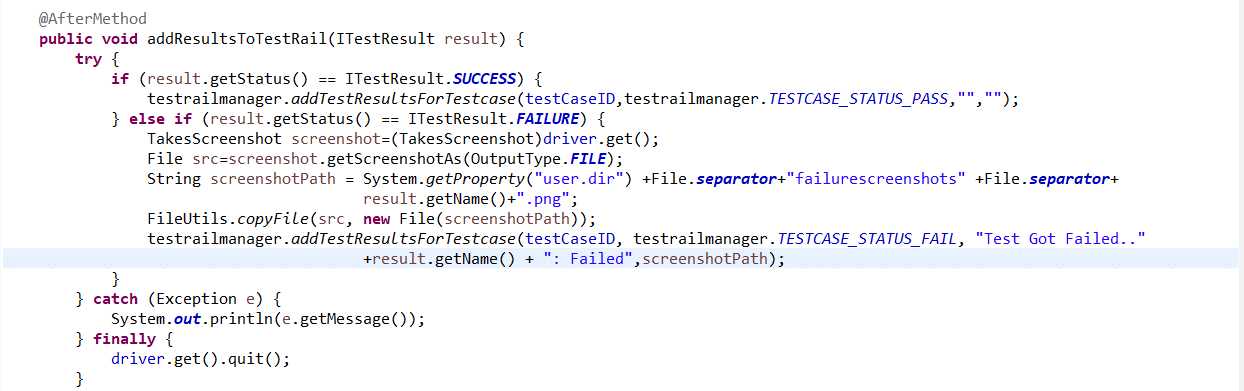
- In Bastest, Add this in @AfterMethod Class, you need to add below code:
@AfterMethod

public void addResultsToTestRail(ITestResult result) {

try {

if (result.getStatus() == ITestResult.SUCCESS) {                    testrailmanager.addTestResultsForTestcase(testCaseID,testrailmanager.TESTCASE_STATUS_PASS,"","");

} else if (result.getStatus() == ITestResult.FAILURE) {

            TakesScreenshot screenshot=(TakesScreenshot)driver.get();

            File src=screenshot.getScreenshotAs(OutputType.FILE);

String screenshotPath = System.getProperty("user.dir") +File.separator+"failurescreenshots" +File.separator+ result.getName()+".png";

            FileUtils.copyFile(src, new File(screenshotPath));

testrailmanager.addTestResultsForTestcase(testCaseID, testrailmanager.TESTCASE_STATUS_FAIL, "Test Got Failed.." +result.getName() + ": Failed",screenshotPath);

            }

            } catch (Exception e) {

                        System.out.println(e.getMessage());

            } finally {

                        driver.get().quit();

            }

}
- Now you need to call TestrailManager Class Methods. First, Create a global variable for testcaseID in test file
public String testCaseID;
- In your test methods, you need to manually define Test Case ID so that Correct @Test should be linked to Test Case ID On Testrail.You can directly call the testCaseID variable in your test class as it already extends BaseTest
Add the Below line to each test.
testCaseID = “1”;
Note – testCaseID should be the same and matched with ID on testrail
- From your test runner file i.e testng.xml, run the test suite and check the results on Testrail
Here is the code snippet for testrailmanager class:
Code snippet for Basetest Class:
 Good to Read:-
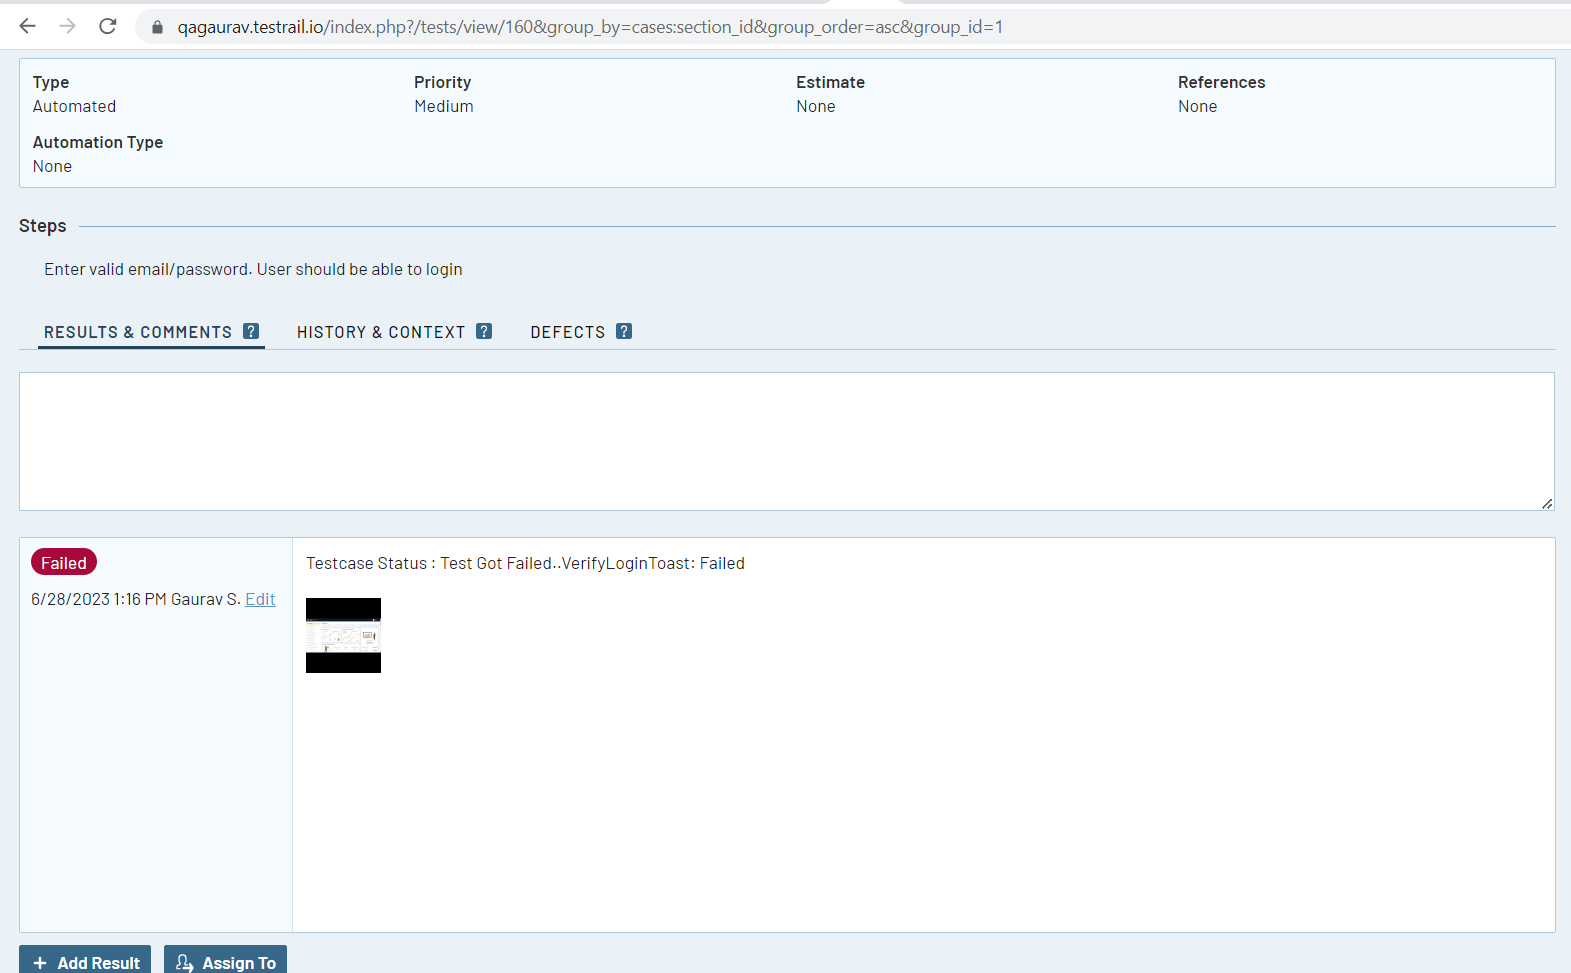
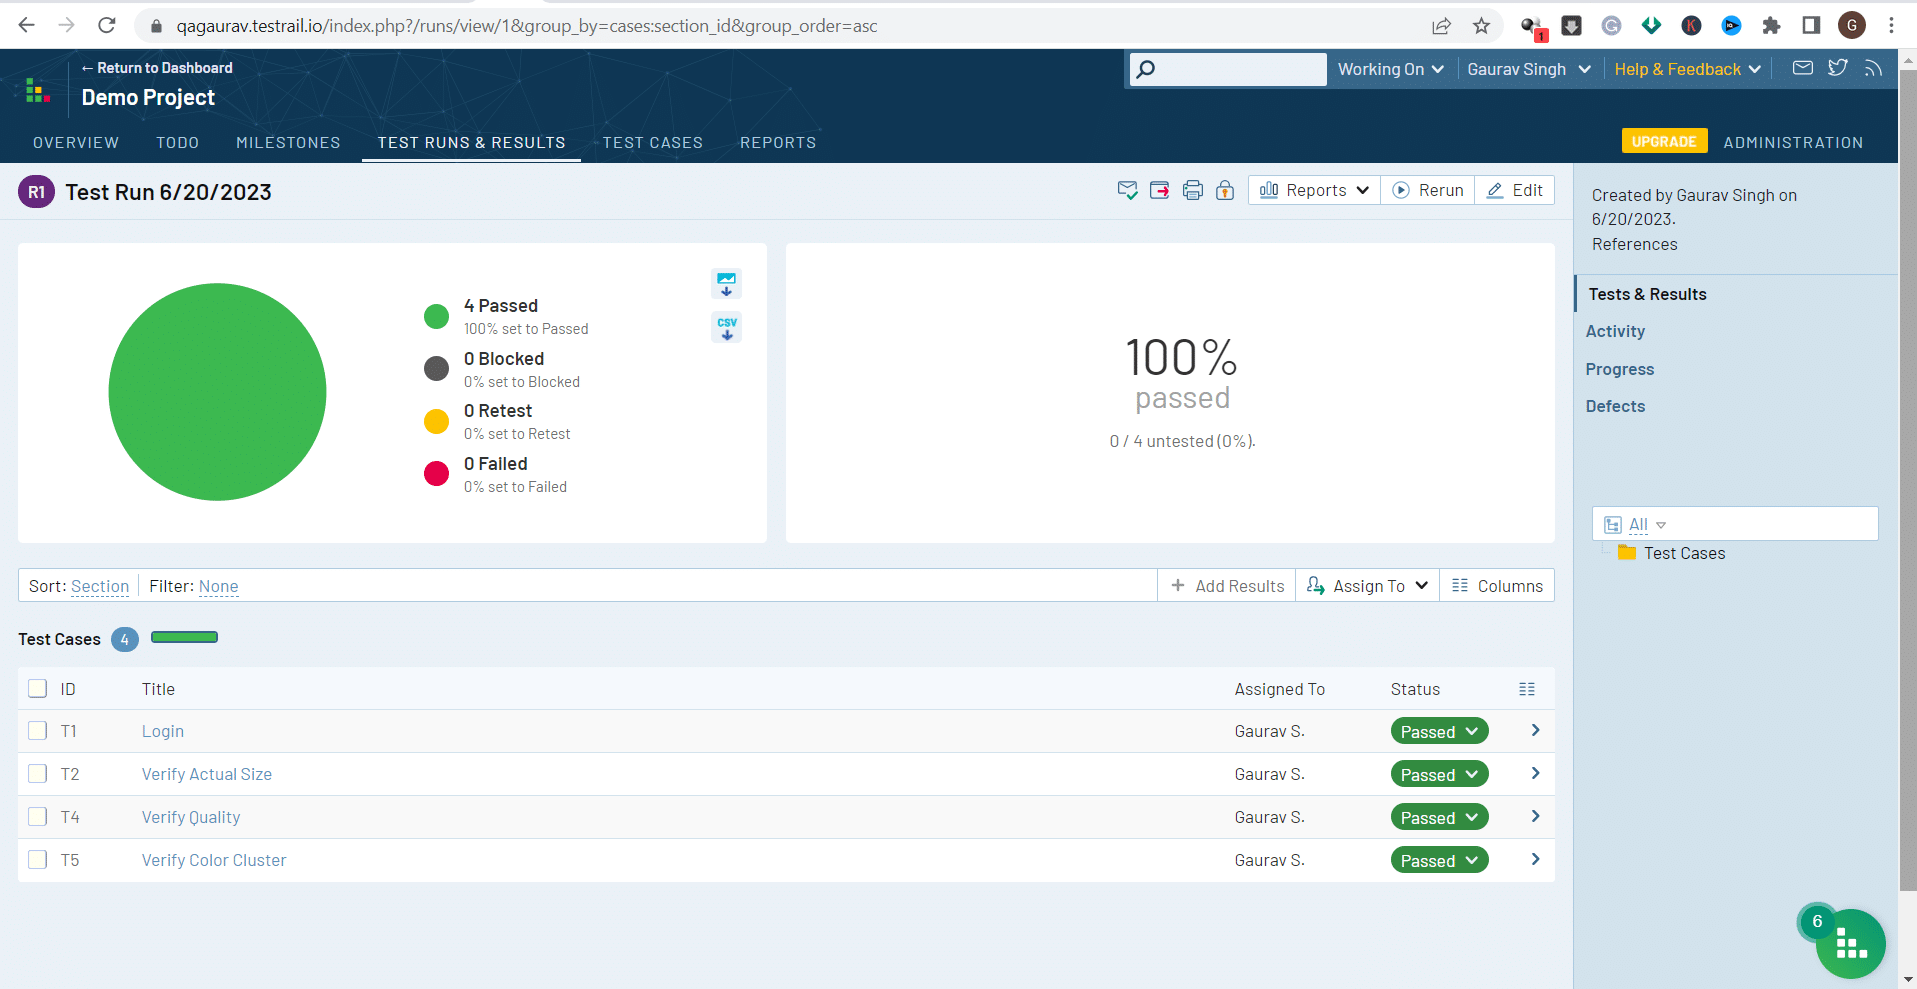
Here is the screenshot for the test run results on testrail:
If the Test Case failed, then it will attach a failed screenshot. So Testrail results will look like this: