
Zephyr is a native application that resides in JIRA and brings test management capabilities to any JIRA project. With the addition of the Zephyr plugin for JIRA, tests can be created and viewed in any JIRA project, linked to other issues, executed immediately or as part of a test cycle, and detailed test, metrics can be tracked.
1) Prerequisites to Install Zephyr Jira Plugin
- Zephyr only works with JIRA 5.x/6.x Server or above and Data Center versions. It should not be installed on JIRA 4.x.
- You need to be a JIRA Administrator in order to install Zephyr for Jira. Please make sure you have the latest version of the Universal Plugin Manager installed, 2.2.4 or above. (Older versions of the Universal Plugin Manager may have issues with installation/license keys.
2) Installation of Zephyr Jira Plugin
- As a JIRA Admin, navigate to the Administration page and click on “Add-ons” in the top menu bar.
- Now click on the “Find new add-ons” menu item and enter “Zephyr for JIRA” in the Search box on the left.
- In the search result, select “Inside JIRA – Zephyr Test Management Plugin for JIRA” and click on the “Buy Now” or “Free Trial” buttons. Click on one of them will take you to https://my.atlassian.com where you can either enter your user id/password or create a new account. This will give you a free 30-day evaluation version or you can buy licenses for Zephyr for JIRA
- The software will now be installed and the License key will be automatically added to activate it.
3) Features of Zephyr Jira Tool
- Create, view, edit, clone, and execute tests
- Link to stories, tasks, requirements, etc.
- Plan test execution cycles
- New Agile integration with Test Boards
- Link defects, Epic links, and stories.
- Project-Centric navigation
- Execution Navigator with basic/advanced search and pre-defined/saved filters
- Two-way end-to-end traceability reports
- Configure, and track quality metrics and share the dashboard
- Zephyr Query Language (ZQL) for advanced searching
- Integrate test automation and CI tools with ZAPI
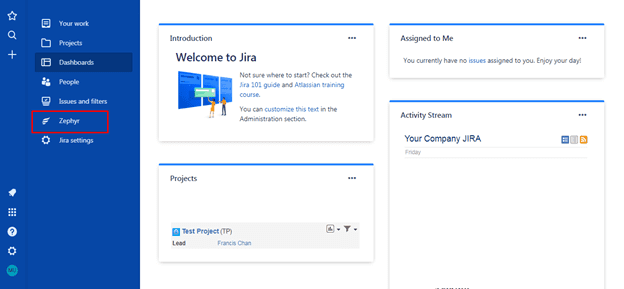
When Zypher is added to your JIRA then a new field Zephyr will start appearing on your JIRA dashboard
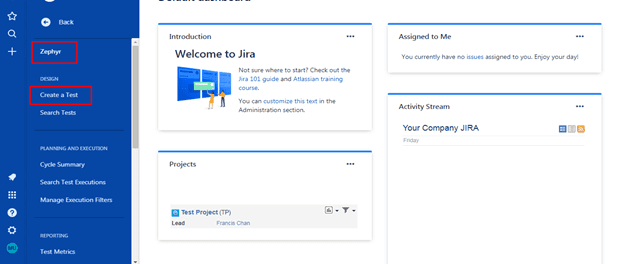
Now you can start creating and adding Test cases in Zephyr for JIRA.
To Create Test Cases in Zephyr
Step 1) Navigate to Zephyr and click on it and then go to Create Test
Step 2) Enter all the details
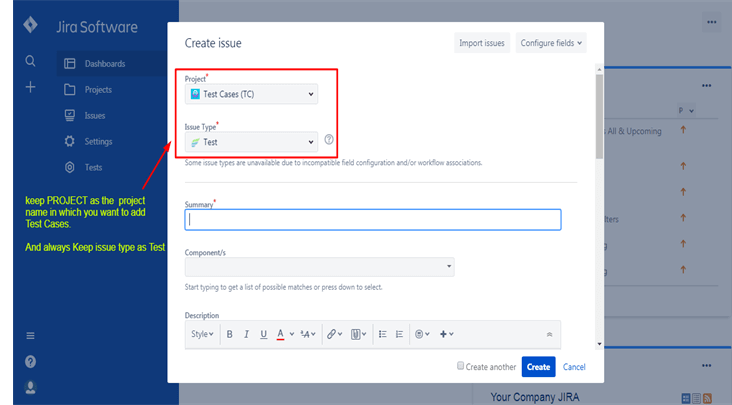
Once you enter all details and click on the ‘create’ button, it will create a Test case ticket. For example TC-001
Once the test cases are created, you can see details like:
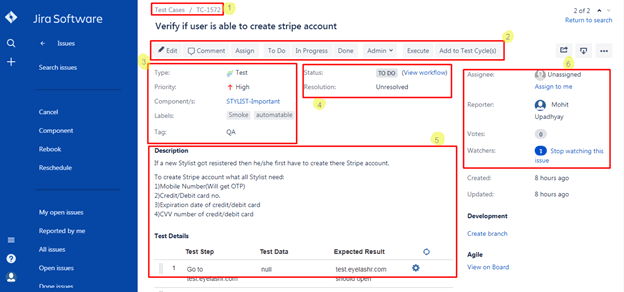
- Test Case Ticket number
- You can Edit, Add comments, Assign, change status, Execute Test cases, and Add to the test cycle
- Issue type, priority, component, Tag affect version, labels, environment, etc.
- Shows details about the status, resolution, and fix version
- Description, Test Step, test data, expected result.
- Shows detail about the assignee and reporter
NOTE: You can customize details according to your requirements.
Options to Import Already Written Test Cases to JIRA
You can also import your already written Test cases to JIRA. We have a couple of different options to import them into JIRA.
1) Using the JIRA Importers Plugin
We will have to convert our files to a CSV format and use this plugin to import your tests into JIRA. We can not import detailed test steps by using JIRA Importers Plugin so generally, we do not use this method to import.
To look into the detail of the JIRA Importers Plugin, go to the link- https://confluence.atlassian.com/adminjiraserver073/importing-data-from-csv-861253680.html
2) Using the Zephyr for JIRA Tests Importer Utility
This utility allows the importing of tests directly from Excel spreadsheets, including detailed test steps.
Recommended to Read – Automating Tests Chrome Devtools Recorder
Prerequisites to Use Zephyr Importer Utility
The import utility is a Java executable jar file. This means that you need to have a copy of Java installed on your computer.
1) Downloading the Utility
To download the latest version go to the following link and look for the zfj-importer-utility-x.y.jar link:
https://bitbucket.org/zfjdeveloper/zfj-importer/downloads/
At the time of writing this article, the latest version is zfj-importer-utility-0.36.jar. Please note that you may get a warning that says that the type of file can harm your computer as you start the download. This is just to indicate that the jar is an executable type of file.
2) Launching
To start the utility either simply double-click on the jar file or run the following command from the command prompt: java -jar zfj-importer-utility-0.36.jar
Zfj importer utility will start and the main screen will be displayed:

3) Configuring
To run the import we must give the appropriate parameters to the importer.
Url – Url of your JIRA
Cloud – Check this option if you are using JIRA on the cloud
Username and Password – The username and password of the user
If you select Cloud two further parameters are displayed, Access Key and Secret Key. These are related to the Zephyr API and are specific to your installation of Zephyr. You can find them by logging into your JIRA Cloud instance and browsing to Zephyr > Automation > API Keys.
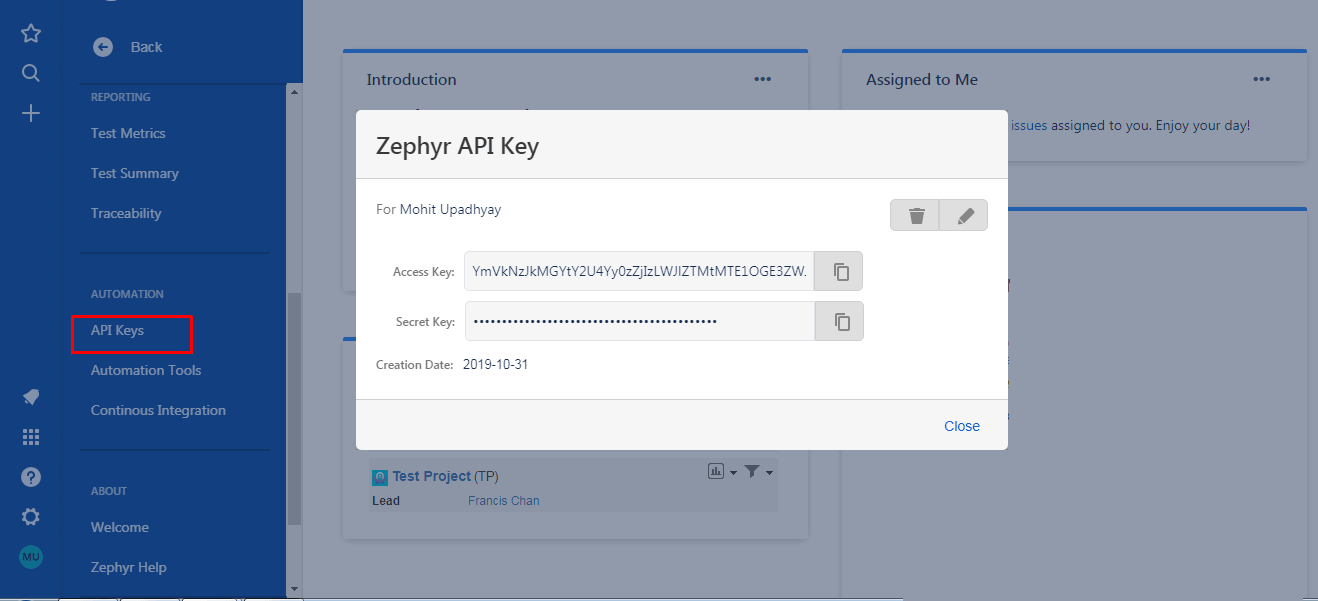
- Copy to the clipboard which copies both Keys to your system clipboard
- Delete which removes the current generated Key Pair
- Regenerate which regenerates the Key pair. Note that once the Keys are regenerated the previous Keys can no longer be used with the Importer Utility.
Use the Copy to Clipboard option to save this Key pair to your system clipboard. You will require it before starting the import process in the Importer Utility.
NOTE
- This Key pair does not expire so users can use their unique Key pair every time they use the Importer Utility.
- Copying to the clipboard copies both Access Key and Secret Key in the below format. Paste it to a notepad. Copy each key individually and paste it into its appropriate box in the importer.
Preparing Import Data
We are now technically set up and nearly ready to import our test cases but first, we need to prepare our data.
The utility supports Excel and XML as input formats.
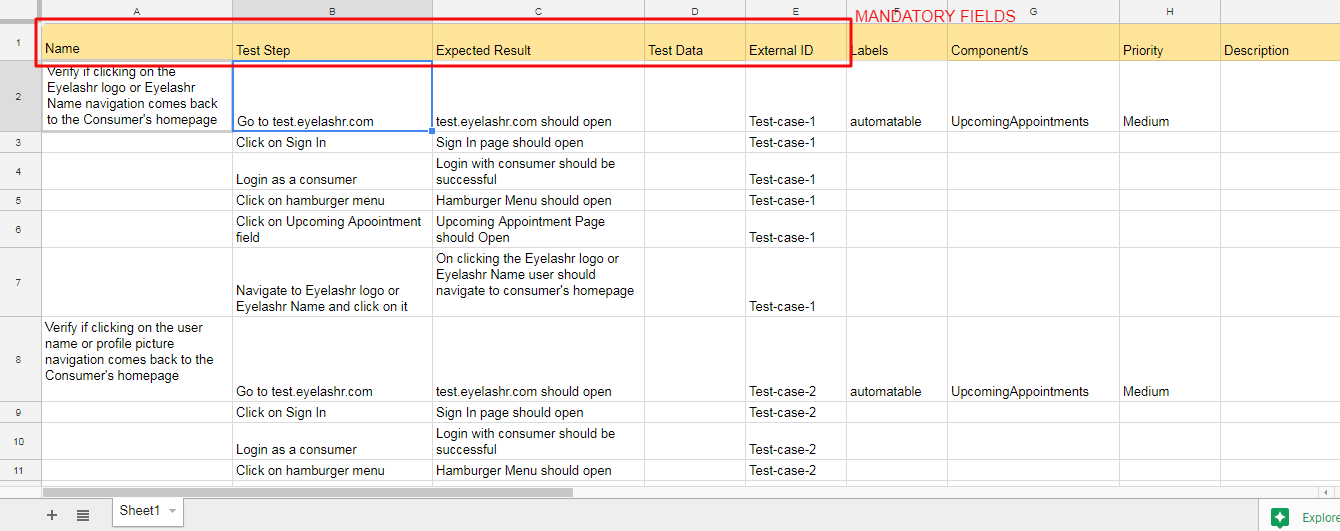
Firstly, we need to create one or more Excel spreadsheets containing the test cases and test steps that we wish to import. At a minimum each file must contain the following information:
- Name
- Step
- Result
- Test data
- External id
Additionally, the following JIRA properties can be optionally set on the Test Case issues created during the import.
- Labels
- Comments
- Version
- Component
- Priority
- Assignee
- Description
- Due date
- Issue Key
- Epic Link
Note: Always make sure to make the first 5 columns (i.e. columns A, B, C, D, and E) contain the Name, Step, Result, Test data, and External ID in that order. These are the mandatory data required for the import and having these be the first columns makes specifying this mapping easy to remember and configure in the utility.
Excel Sheet
- Row 1 is a header row and will ignore by the importer
- Rows 2, 3, 4, 5, 6, and 7 represent the first test case, with an external ID of “Test-case-1”.
- Rows 8, 9, 10, and 11 represent the second test case, “Test-case-2”.
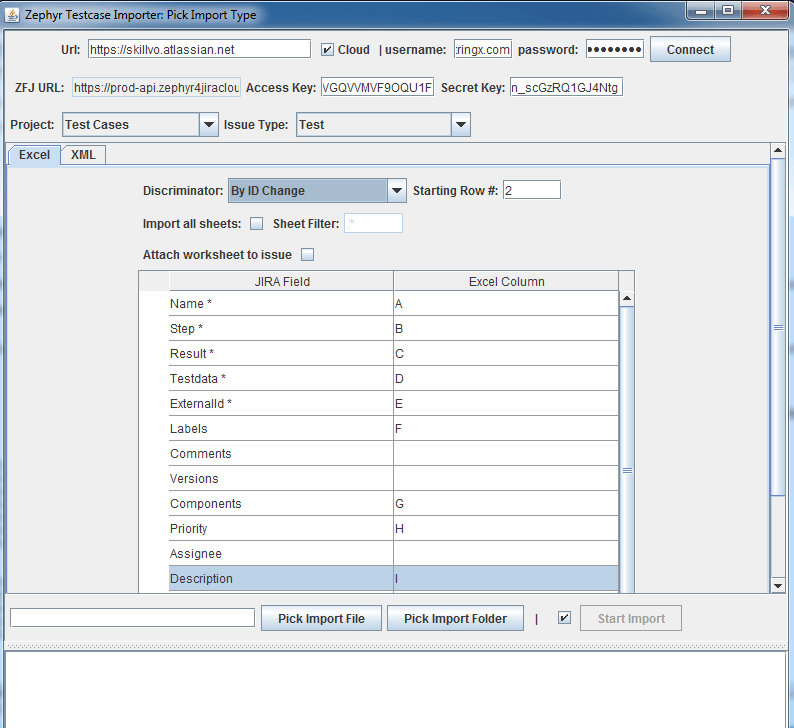
Importing
- Firstly, download your Google sheet as an MS Excel file
- Enter the URL for your JIRA Server or Cloud instance. If importing to Zephyr for JIRA Cloud, make sure the Cloud checkbox is checked. Enter your JIRA username and password. Zephyr for JIRA Server version users proceeds to Step 3
- For Zephyr for JIRA Cloud users only: The “ZFJ URL” field is a read-only field and is pre-enter. Enter your API Access and Secret keys
- Click Connect
- Select the project and issue type desired (supported: Test, Bug, Improvement, Task, New Feature)
- Select a Discriminator and enter Starting Row value
The Discriminator field uses by the Zfj importer utility to determine the end of one test case and the beginning of the next test case. It allows one of four options for selection:
- By Sheet: Use this when a test case list per the Excel sheet
- By Empty Row: Use this when an empty row separates consecutive test cases
- By ID change: Use this when a unique test ID exists for each test case to import
- By Test Case Name change: Use this when each test case has a unique test case name
Recommended to Read:- QA Automation Tools
JIRA Field and Excel Column Mapping
Map your Excel spreadsheet columns to your Zephyr for JIRA fields. Use the column letters instead of any headers you might have to reference the data. For example: if the test case name is in Column A of the Excel sheet, enter “A” against the JIRA field “Name”
- Pick Import File or Pick Import Folder
Select the Excel file which you want to import by choosing either Pick Import File or Pick Import Folder.
- Start Import
Click Start Import. The results of the import will appear in the log window at the bottom of the utility. Also, any errors that occur will display here.
FAQs
- What is the difference between Jira and Zephyr?
Any JIRA project can benefit from the quality test management tools provided by Zephyr for JIRA, a native JIRA application. When Zephyr is used in conjunction with JIRA, the test can be written, seen in any JIRA project, and run instantly or as a component of a testing cycle that might be connected to other issues.
- Is Zephyr an automation tool?
Popular test automation tool Zephyr for Jira has been perfectly integrated with Jira. It is accessible via the cloud and server. It has all the amenities one would anticipate and is highly good at organizing manual testing.
- Why do we use Zephyr?
Zephyr is a testing solution that enables you to manage and track your testing efforts to improve the quality of your products. With Zephyr, you can create test cases, group tests according to product releases and components, assign tests to your quality assurance team, and track test execution and results.
- Is Zephyr a test management tool?
Zephyr is a testing tool that manages and tracks end-to-end testing to raise the caliber of your product. Test-case generation is one of its main skills. Tests organize according to product releases and components.
- Which is better TestRail or Zephyr?
Although the capabilities of TestRail are largely the same, it is a little more difficult to extract the information. Zephyr often use in simpler situations than TestRail, though.
- What are the types of SQL commands?
The three primary categories of commands are. commands in the DDL (Data Definition Language), DML (Data Manipulation Language), and DCL (Data Control Language) programming languages.
If you are interested in even more software testing-related articles and information from us here at Devstringx, then we have a lot to choose from for you.


