
To Understand what is Cucumber, we must first understand What Is Behaviour Driver Development (BDD)?
What Is BDD?
BDD is one of the Development approaches which involves the usage of a common language that enhances communication between various tech and non-tech teams. Tests are more user-focused and based on the system’s behavior. In “BDD”, the Given, When, Then approach is used for writing test cases.
- Given: In this keyword, we define the pre-condition of our test case.
- When: This is where we define the Actions that are to be performed in order for our test case to run.
- Then: Here we validate the outcomes of the test case, basically comparing the expected and actual test case
What Is Cucumber?
Cucumber is a tool that supports writing test cases in the Behavior Driver Development format. Cucumber also provides a lot of additional features like Tags, and Hooks Feature files, which actually decrease the number of lines in our code.
It is a test automation tool that supports BDD (Behavior Driven Development) because it supports easily understandable and plain testing scripts. This is a tool used in software testing to test the application through automation and get good coverage of the application.
As it supports BDD so all the test cases are written in very simple and plain English which can be understandable by one who even doesn’t have any technical skills and that language is called Gherkin Language. Cucumber tools support almost programming languages like Java, PHP, Dot Net, Perl, Python, etc.
How Is Cucumber Different from Selenium?
Selenium is the tool to design web Automation Tests, whereas Cucumber helps to design Framework for Selenium Automation tests written in BDD standard.
Pre-requisites
For our automation framework to understand Cucumber concepts, we must install one Plugin, called Cucumber Plugin (That is available in the Eclipse marketplace, or could be found in maven dependency).
Cucumber needs a skeleton to run on it, we call it Maven. We have our pom.xml file where we add all the dependencies of the project. For the project, we need to install Cucumber’s latest version from the mvnrepository.
Terminologies In Cucumber
In order to use Cucumber to automate the test cases, we need to use the following terms:
- Feature File
- Feature
- Tags
- Scenario
- Step Definition File
- Test Runner File
-
Feature File
A feature file is a file with the extension .features. It is where we write all the scenarios and steps in the “Given, when and then” format is written properly in plain English.
This is the very first file that allows us to write features, scenarios, and feature descriptions that need to be tested by the Cucumber automation of an application. The extension of the feature film is “.feature” and every functionality of an application must be written separately. We write the acceptance steps of an application with the help of some keywords like Feature, Scenario, Given, When, Then, And, etc.
Feature file Example for Login functionality
- Feature: Login
- Scenario: Login scenario
- Given: The user is on the login page of HRMS (https://clovehr.com/login?url=devstringx)
- And: User tries to login through a valid username “Username” and password as “Password@123”
- Then: The login must be successful.
-
Feature
This is a functionality of an application or we can say it is a requirement for that particular application created by the user. Below are some common features of the HRMS application:
- Add/Edit the timesheet for the current week
- Apply leave and WFH functionality
- Leave approve functionality
- Create and delete IT tickets in Help-Desk
-
Tags
Tags are used to categorize our test into different phases like Smoke, Regression, Sanity, etc. It plays an important role when we have hundreds or thousands of an application that have different purposes. In that case, we need to use Tags and categories for our scenarios so that according to our requirements we can perform our testing.
-
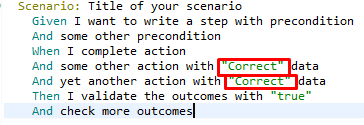
Scenario: Title of Your Scenario
The scenario is an important term in cucumber when we write our test in the Gherkin language. It contains all the steps for a particular feature or functionality. A feature file can have multiple scenarios and each scenario can have more than one step. To write a scenario we need to use some keywords in a sequence manner and those keywords are supported by a language called Gherkin.
Below are the given keywords which are used to create a scenario in the feature file:-
- Given I want to write a step with precondition
- And some other precondition
- When I complete the action
- And some other actions with “Correct” data
- And yet another action with “Correct” data
- Then I validate the outcomes with “true”
- And check more outcomes
We use “And” in the Scenario to combine the step with the previous steps in our feature file.
-
Step Definition File
This is our class, where we write the code to automate each step on the scenario from our feature file. We map the test methods written in the step definition file with the test step written in the feature file. This is a programming language file (.java or .rb) that maps the steps (Given, When, Then) which are defined in the feature file. Each scenario contains a Given When Then format and according to the definition, we create methods in the step definition file to perform the tasks accordingly.
-
Test Runner File
This is where we pass the path of our feature file, and mention all the scenarios to run in our test run.
Getting Dynamic Data from the Feature File
When we have to run the same tests with some positive and negative scenarios. We use one correct and one incorrect data. How can we do it through Cucumber?
We can use the same line of code in our feature file, we put the dynamic data in double quotes “dynamic data”. And use that data in our feature file using regex. Example:
Implement the above line or code in our Step definition class:
@And("^some other action with \"([^\"]*)\" data$")
public void some_other_action_with_something_data(String strArg1) throws Throwable {
    System.out.println("Printing data from When with data...."+strArg1);
    }

@And("^yet another action with \"([^\"]*)\" data$")
public void yet_another_action_with_something_data(String strArg1) throws Throwable {
    System.out.println("Printing some more data from When with data...."+strArg1);
    }
We use Regex, for the same implementation but with different data.
Getting Data from the Feature File:
Tables in Cucumber: When we want to run the tests with different data. We can write the data in a line separated by a Pipeline Operator- “|”. Cucumber is smart enough to separate the data between these pipeline operators. Example:
| jenny | abcd | john@abcd.com |Australia | 3242353|
To use this data in our test Class:
We use this data, we create a list of Lists
List<List<String>> allData= new ArrayList<List<String>>();
allData= data.asLists();
 allData.get(0).get(0);
This will return the data in the first column of the first row. In our case, it is “jenny”. Now we can use it anywhere in our code.
Recommended to Read- Most Popular Automation Testing Tools List
Parameterization of the test cases
In order to use Parameterization, we must write and declare the Scenario outline first
- Scenario Outline
We define all the scenarios in our feature file and when we want to run the tests multiple times but with a different set of data.
User login with a different username. Login with 10 different usernames and passwords.
How to achieve it?
In our feature file:
In the Step, we should make a dynamic variable with <UserName> and password <Password>
- Examples
|Username |Password|
|user1 |pass1 |
|user2 |pass2 |
|user3 |pass3 |
|user4 |pass4 |


In this scenario, the test case will run 5 times with the UserName and Password as mentioned above.
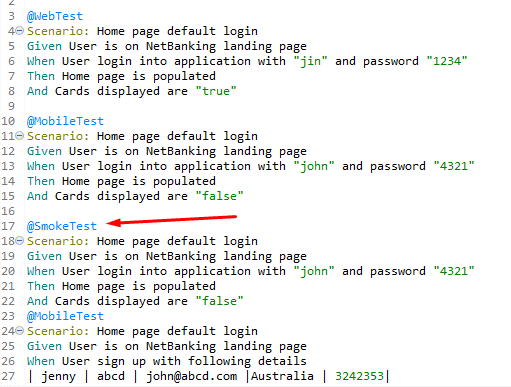
Tagging Feature In Cucumber
Suppose, we have a scenario where we want to run only selected test cases, then we can tag them as @SmokeTests, @SanityTests, @RegressionTests, or @MobileTests.
Cucumber provides us the facility to run only the test cases with the Tags that we want to run.
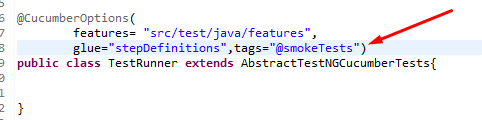
We can provide the tag name of the test cases in our Runner file, and that’s it. Only test cases which are tagged with the tag we mentioned, will run.
Example: In the screenshot below, the scenario is tagged with @smokeTest. When we mention this in our Runner class. Only this class will run.
Our Runner Class
Note: We can run tests with Multiple tags. Let’s say we want to run both Smoke and Sanity Tests, we can pass both the tags in our Runner class. And all the Test Methods are tagged with both the @SmokeTests and @SanityTests.
Understanding or and “And” or not in the tags:
- @SmokeTest: Only Smoke tests will run
- @SmokeTest and @RegTest: TestMethods with both tags- smoke and Regression tests will run
- @SmokeTest or @RegTest: TestMethods with either tags- smoke or Regression will run. Tests with both tags will not run here.
- not @SmokeTest: All the test cases except the SmokeTests will run
Recommended to Read- What Is Smoke Testing?
Other Tags in Cucumber
@Background Keyword: The Background keyword is used to define what all steps should run before all our test cases. It is just like the BeforeClass in TestNg Framework. The Steps mentioned in Background will always run first.
All the test steps mentioned under the Background will run before all our scenarios in our feature file.
We use this keyword when pre-requisite is common across all the feature files.
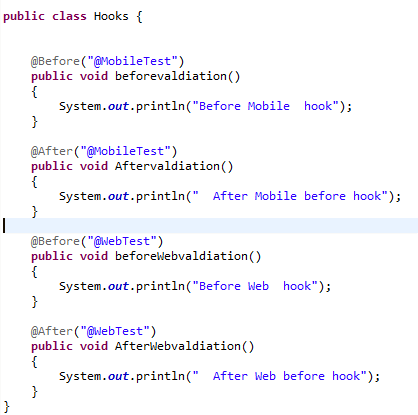
Hooks In Cucumber
We use hooks when we want to run a piece of code before or after some of the test methods in our feature file.
- @Before Keyword: The steps mapped with the Before keyword will always run before all the scenarios of the feature file.
Example: @Before(@MobileTest)
Public void beforeValidation(){
}
What this means is, all the before-validation classes will run before all the mobile test Methods.
We can’t use Background and @Before together for the same feature test, as it will create ambiguity and Cucumber will not be able to decide which one to run tests. As both of these run before the test methods
- @After Keyword: The steps mapped with the After keyword will always run after each scenario mentioned in our feature file.
We generally use this hook to close the browser, quit the driver, or log the test status in the console.
Good to Read:- How to Use Cucumber Automation Testing Tool?
Create Maven Project with Cucumber in Eclipse IDE
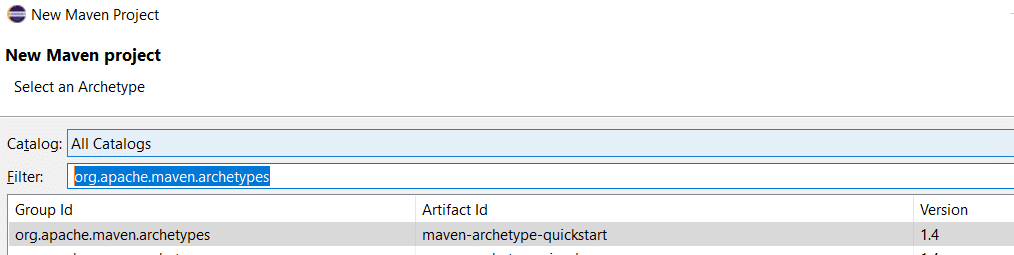
- Open Eclipse and create a maven project and make sure you have selected archetypes as “maven-archetype-quickstart” as described in the below pic
- Dependency for Cucumber: We need to use two dependencies as we are using Cucumber with the JUnit framework
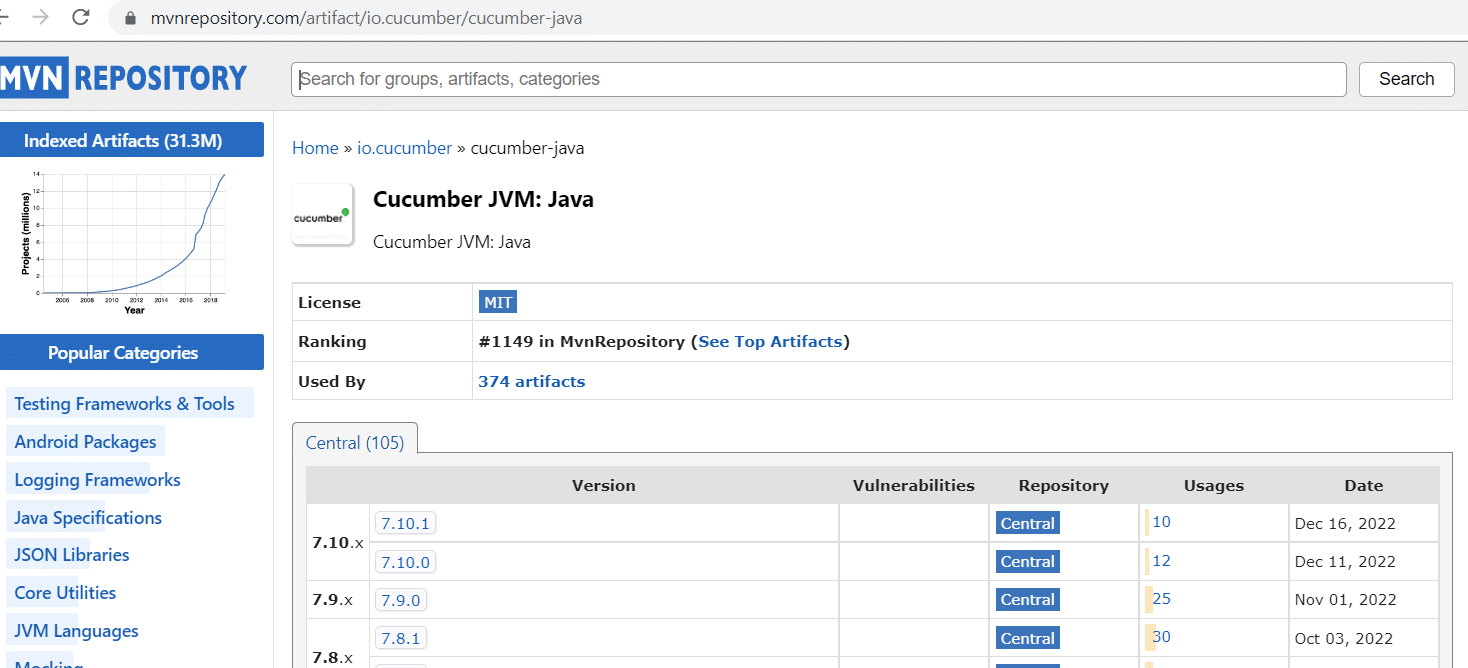
- Cucumber JVM: Java
- Cucumber JVM: JUnit
Search on Google for a maven repository or navigate to https://mvnrepository.com/ and search for the above dependencies, select as shown in the below pics, and use it in your project pom.xml file:

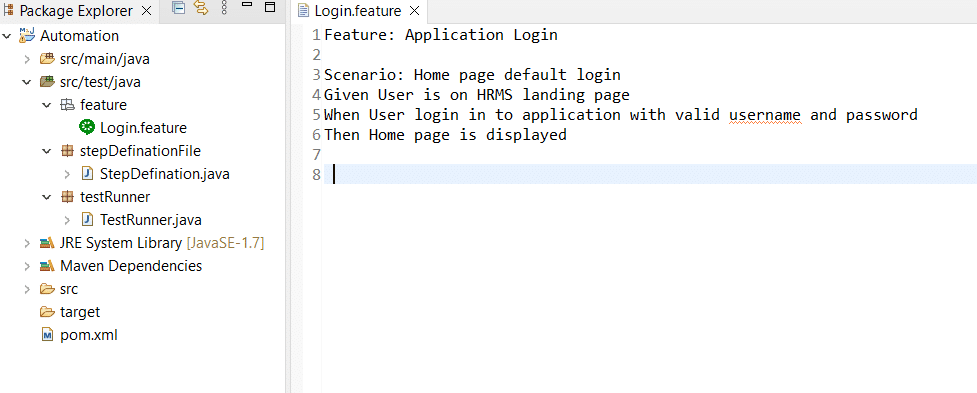
- Create a feature file and define the scenario as described in Pic:
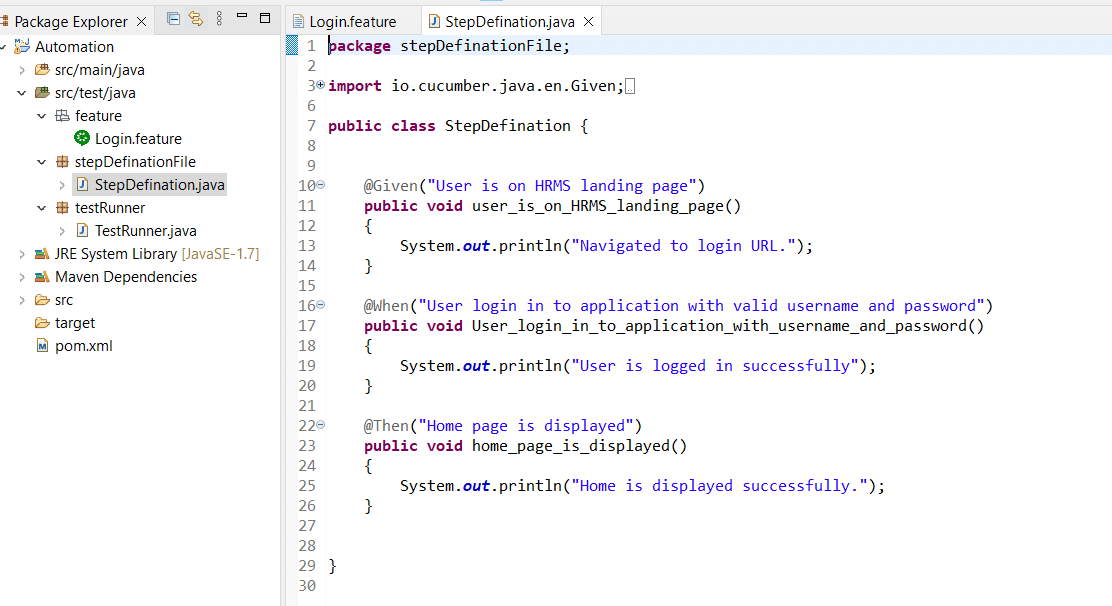
- Create a Step Definition file to map the steps which are defined in Login. feature file as described in pic:
- Create a Test Runner class that will run our test as described in Pic:

- Now time to run your test, so run this test as JUnit Test


QA Touch supports the cucumber BDD using webdriver.io. You can sync your webdriver.io automation test results to QA Touch with our handy QA Touch reporter.
The steps are below:
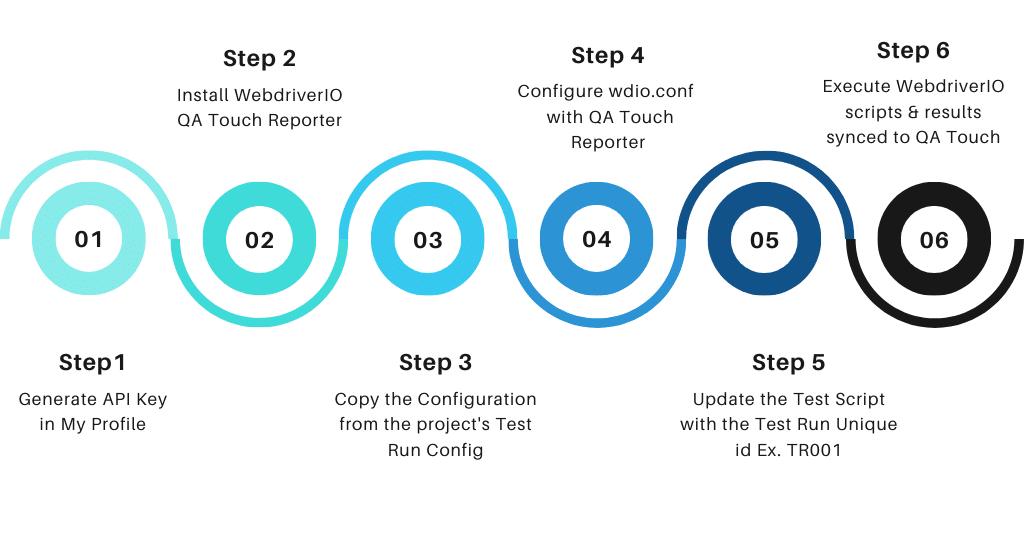
QA Touch & Webdriver Integration Process
- Login in QA Touch.
- Click My profile – Generate an API key.
- You can refer to QA Touch API from:- https://doc.qatouch.com/#qa-touch-api
- Access the URL:- https://www.npmjs.com/package/wdio-cucumber-qatouch-reporter
- Install the package by executing the below command from your automation environment from the command line.
- Github: https://github.com/gitdckap/wdio-qatouch-cucumber-reporter
- $ npm i wdio-cucumber-qatouch-reporter
Hire experienced cucumber developers today and elevate your testing process to ensure high-quality, reliable software. Contact Us now to get started!


