
What Is Swagger?
Swagger is an open-source platform, where we document the restful API and their respective entities in proper formation about the endpoint and key and value and their datatype.
- For Integrating swagger with spring we need to add the below dependencies in pom.xml
<dependency>
            <groupId>org.springdoc</groupId>
            <artifactId>springdoc-openapi-ui</artifactId>
            <version>1.6.3</version>
            <scope>compile</scope>
        </dependency>
        <dependency>
            <groupId>org.springdoc</groupId>
<artifactId>springdoc-openapi-security</artifactId>
            <version>1.6.3</version>
            <scope>compile</scope>
        </dependency>
- Now we need to configure swagger so we create on swagger config file with the below code
@Configuration
public class swaggerConfig{

    @Bean
    public OpenAPI springShopOpenAPI() {
        return new OpenAPI()
                .info(new Info().title("Demo api's")
                .description("Powerwed by xyz")
                .version("v1")
                .license(new License().name("Apache 2.4.29").url("www.xyz.com")))
                .externalDocs(new ExternalDocumentation()
                .description("License of API")
                .url("www.xyz.com"));
    }
}
We need to annotate this class with @configuration annotation. Method springShopOpenApi is used to add information about our basic details like title, description, version of our API’s company, and how to make this.
After the configuration above settings, we need to make API with some More annotations some of the examples mentioned below
@RestController
@RequestMapping("api/v1")
public class UserControllerImpl implements UserController {

    @Autowired
    public UserService userService;

    String regexPattern = "^(?=.{1,64}@)[A-Za-z0-9_-]+(\\.[A-Za-z0-9_-]+)*@"
            + "[^-][A-Za-z0-9-]+(\\.[A-Za-z0-9-]+)*(\\.[A-Za-z]{2,})$";

    // login api
    @Transactional
    @PostMapping(path = "/login", consumes = "application/json")
    public ResponseEntity<Object> login(@Valid @RequestBody Login entity) {

        if (entity.getPassword().isEmpty() || entity.getPassword().length() <= 4) {
            ApiResponse apiResponse = new ApiResponse(true, ResMesConstants.INVALID_PASSWORD_LENGTH,
                    HttpStatus.PRECONDITION_FAILED, null);
            return new ResponseEntity<Object>(apiResponse, HttpStatus.PRECONDITION_FAILED);
        }

        Users user = userService.findByEmail(entity.getEmail());
        if(user == null){
            logger.info(ResMesConstants.USER_DOES_NOT_EXIST);
            ApiResponse apiResponse = new ApiResponse(true, ResMesConstants.USER_DOES_NOT_EXIST,
                    HttpStatus.UNAUTHORIZED, null);
            return new ResponseEntity<Object>(apiResponse, HttpStatus.UNAUTHORIZED);
        }
        if (new BCryptPasswordEncoder().matches(entity.getPassword(), user.getPassword())) {
            ApiResponse apiResponse = new ApiResponse(false, ResMesConstants.LOGIN_SUCCESSFULLY, HttpStatus.OK, res);
            return new ResponseEntity<Object>(apiResponse, HttpStatus.OK);
        } else {
            logger.info(ResMesConstants.INVALID_USER_PASSWORD);
            ApiResponse apiResponse = new ApiResponse(true, ResMesConstants.INVALID_USER_PASSWORD,
                    HttpStatus.UNAUTHORIZED, null);
            return new ResponseEntity<Object>(apiResponse, HttpStatus.UNAUTHORIZED);
        }
    }
}
- After making API we need to define parameters with their respective description so one of the request classes mentioned below
public class Login {
    String email;
    String password;
    @Schema(description = "either self or google",example = "self")
    String tokenType;

}
Recommended to Read- What is Spring Boot in Java?
Here in @Schema annotation, we define what kind of data this key accept and also set some default value in the example
Some more important annotations mentioned below with their use
- @Api → @Tag
- @ApiIgnore → @Parameter(hidden = true) or @Operation(hidden = true) or @Hidden
- @ApiImplicitParam → @Parameter
- @ApiImplicitParams → @Parameters
- @ApiModel → @Schema
- @ApiModelProperty(hidden = true) → @Schema(accessMode = READ_ONLY)
- @ApiModelProperty → @Schema
- @ApiOperation(value = “foo”, notes = “bar”) → @Operation(summary = “foo”, description = “bar”)
- @ApiParam → @Parameter
- @ApiResponse(code = 404, message = “foo”) → @ApiResponse(responseCode = “404”, description = “foo”)
After following the above process we need to run the application with the below URL:-
http://localhost:8082/swagger-ui/index.html
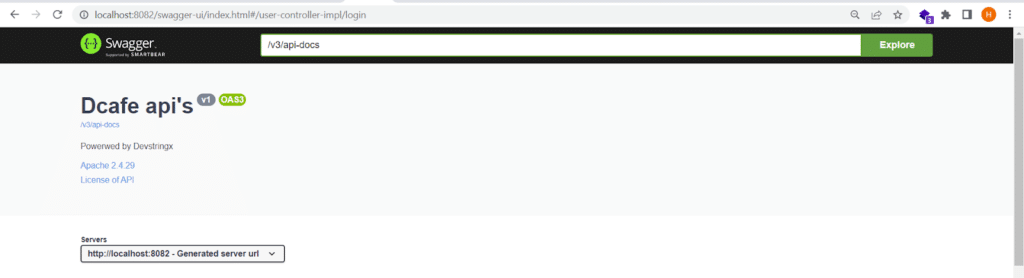
Figure 1
API document should be like below
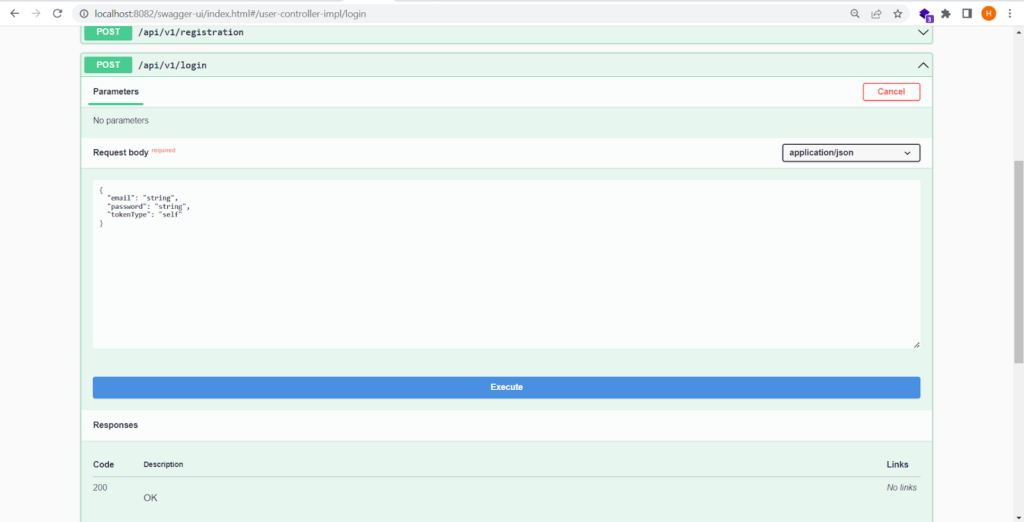
Figure 2
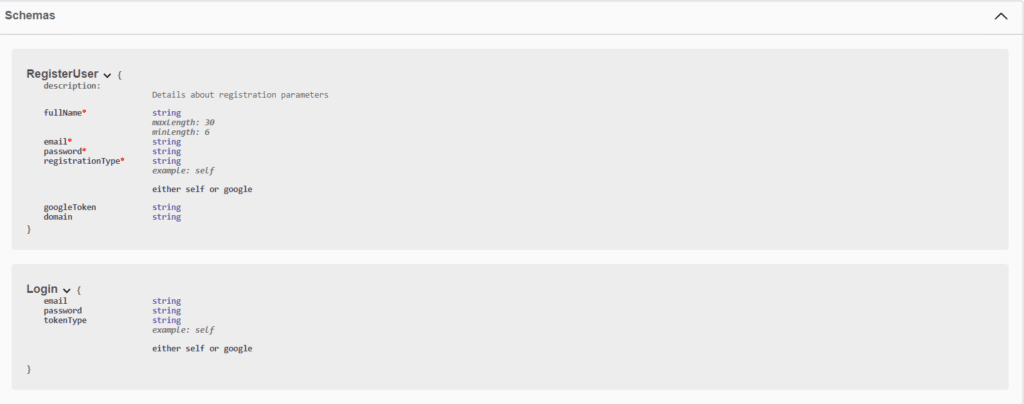
Figure 3
Conclusion
In this blog, we learned to set up swagger 3 with spring boot with too many important annotations and their use and check what annotation we used where and when for their respective situation.
If you are interested in even more development-related articles and information from us here at Devstringx, then we have a lot to choose from for you.


