
In this blog, we learn how to automate and execute test cases on the Gitlab pipeline step by step using selenium java.
Prerequisite
- You must be familiar with the Selenium-Java concepts.
- You have eclipse, JDK, maven, and git installed on your system.
- You should have a Gitlab account.
Follow these steps to create an automation script that supports Gitlab CI/CD Pipeline.
Steps:
- Add dependencies within pom.xml.
- Create Base Driver Class
- Create Test Class
- Create a TestNG suite file
- Add plugins within the XML
- Create GitLab yml file
- Run tests on the GitLab pipeline
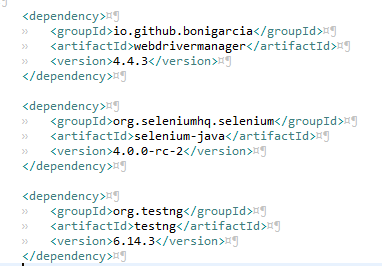
Step 1: Add Dependencies Within pom.xml
The below dependencies “webdrivermanager”, “selenium”, and “testing” required in the pom.xml file.
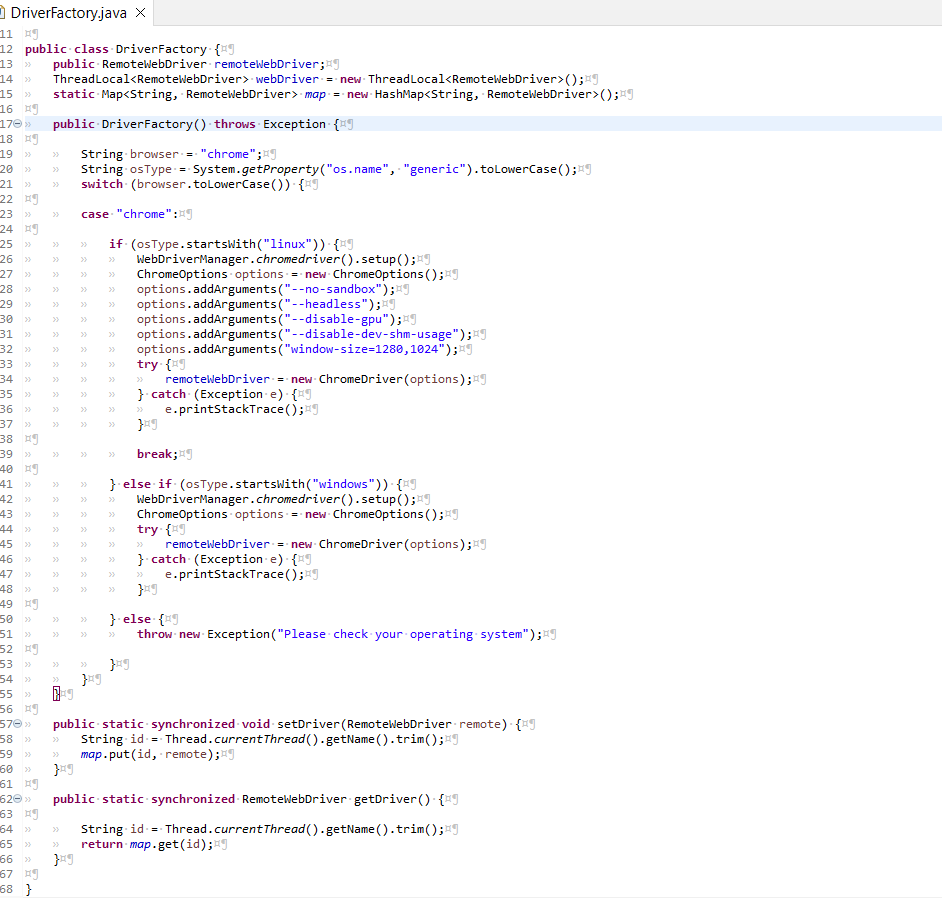
Step 2: Create Base Driver Class
In src/test/package create a package called ‘init’ inside of the package create a new class named ‘DriverFactory’
Inside the constructor, the logic of the base driver logic is written into a switch condition block. We added driver initialization to the chrome browser along with the operating system that supports Linux and Windows. In addition, we can implement the same logic for different browsers.
To set up the web driver we use WebDriverManager in place of binary files (chrome driver.exe)
As the pipeline performs the tests in the headless mode, the “–headless” option is added and the “window-size=1280,1024” is optional.
To Solve the browser crash issue in the pipeline, we make sure that the chrome options should have ‘no-sandbox’, ‘disable-gpu’, and ‘disable-dev-shm-user’ options.
In order to overcome a duplicate web driver instance, we use the getter and setter methods to get the actual web driver instance.
- setDriver method helps to add the browser instance to ThreadLocal webdriver using a hashmap.
- getDriver method helps to obtain the browser instance ID which has been stored in the ThreadLocal webdriver hashmap.
Read Also:- Cucumber Automation Testing Tool
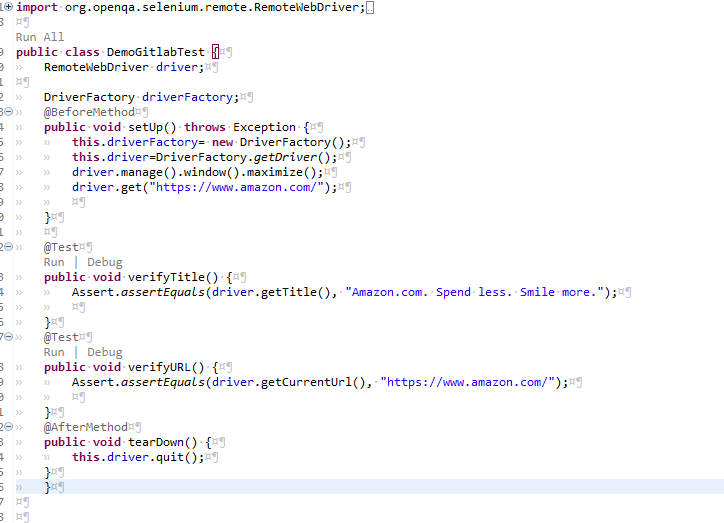
Step 3: Create a Test Class
In src/test/java create a class named “DemoGitLabTest”.The test class contains the TestNG method implementation in which the browser configuration is set into startUp (beforeMethod), the browser close into tearDown (afterMethod), and the test script is written under the test annotations.
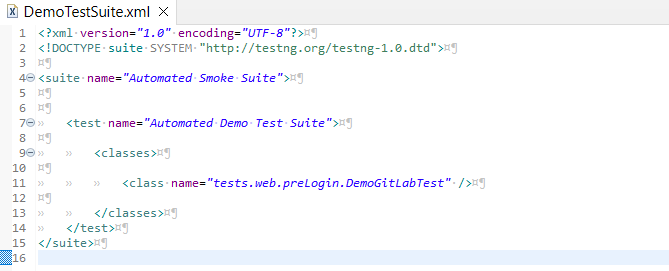
Step 4: Create a TestNG Suite File
Inside the project, add a folder named “TestSuite” and create an XML file called “DemoTestSuite”.
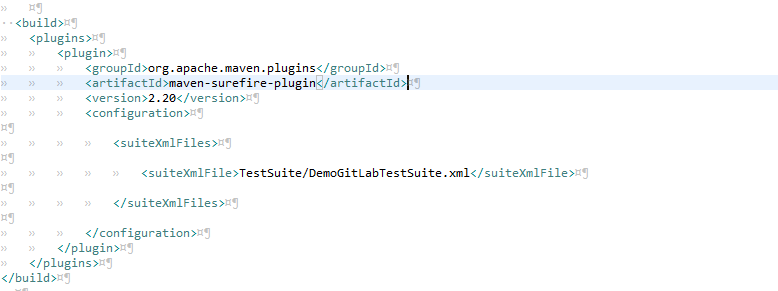
Step 5: Add Plugins With the pom.xml File
To run the TestNG tests using Maven, we have to add a maven surefire plugin and inside the configuration provide the path to the TestNG suite where the XML file is located.
Read Also:- Behavior Driven Development Testing Tool
Step 6: Create Gitlab yml file
Within the project, create a yml file named “GitLab-ci”. The steps to follow when writing the code into the yml – Gitlab Runner Configuration variable are in the following order.
- Stages
- Jobs
- Tags
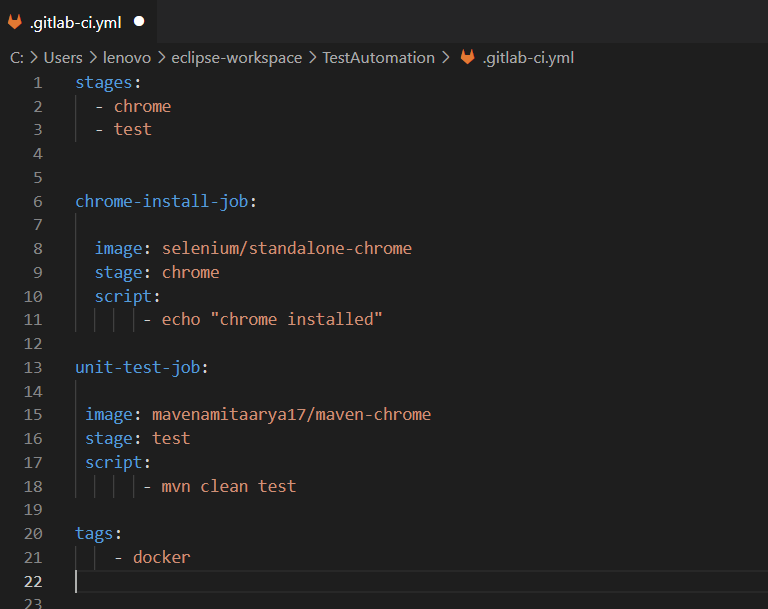
In the GitLab-ci yml file, stages are added in the names ‘chrome’ and ‘test’ the GitLab runner will execute the stage as block per block, each block containing a stage.
Following that, jobs were created in the names ‘‘chrome-install-job’ and ‘unit-test-job’. Inside the job, there should be an ‘image’ ‘stage’ ’script’
- The image is a reference to the docker image we added to the tag in the file.
- The stage is the block that executes the code block per block
- The script is a command that runs our code through CLI.
Step 7: Run Tests On the Gitlab Pipeline
On your local machine, commit and push the latest code to Git and follow the steps below to run the tests:
- Log on to your GitLab account and open the automation project.
- Click the side panel ‘CI/CD’ and select the option ‘Pipeline’
- Click on the “Run Pipeline” option located at the top right corner
- Select your branch name and run the pipeline
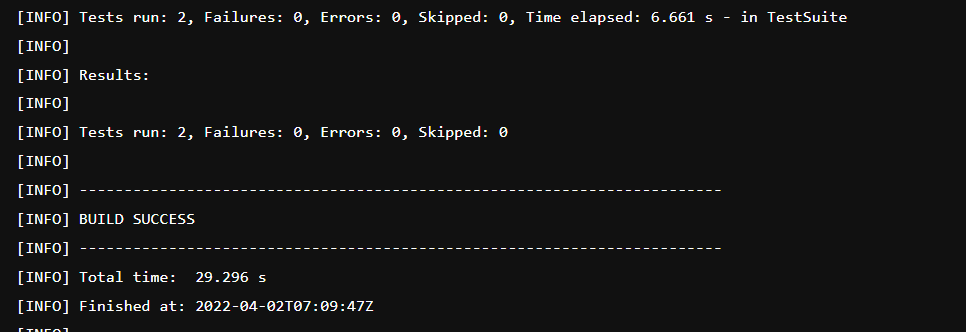
- Next, you will see the pipeline being executed and check the status/progress bar.
- Following the run, the logs capture the pipeline results.
FAQs
- How are GitLab and Selenium integrated?
Automated GitLab CI Testing
Start GitLab CI and finish. Download GitLab CI, then configure it to meet your needs. Make a straightforward Selenium test. Modify the. GitLab-ci. yml file in your repository to indicate you want to perform a Selenium test before adding a straightforward Selenium test to your GitLab project.
- Is GitLab a tool for automation?
All the procedures needed to create, test, and deploy your code to your production environment are automated by GitLab Continuous Integration and Delivery. Continuous integration automates builds, collects input through code reviews, and runs security and code quality checks automatically.
- Is GitLab a tool for test management?
The best all-in-one GitLab test management tool with seamless CI/CD integration and full GitLab issue management. Utilize a robust platform to manage all of your test cases, exploratory sessions, and test automation. For a full DevOps workflow, GitLab is connected with test cases, exploratory testing, and test automation.
- Can CI CD be done with GitLab?
GitLab CI/ CD is utilized not just for writing code but also for inspecting or reviewing code. With simple merge requests and merge management solutions, collaboration is improved.
- The GitLab pipeline failed why?
It’s possible that the code in your most recent commit is susceptible or that a dependent is in jeopardy. In either case, the pipeline would fail since the security test would fail.
If you are interested in even more software testing-related articles and information from us here at Devstringx, then we have a lot to choose from for you.


