Create Jira Ticket in Java Using Rest Assured
Jira is a powerful project management tool that offers a REST API that allows developers/testers to interact with Jira programmatically. By using the RestAssured library in Java, we can automate the process of creating Jira tickets, enhancing productivity and streamlining project workflows. In this blog, you will learn how to create Jira tickets programmatically.
What is RestAssured?
RestAssured is a Java library designed to simplify the testing and automation of RESTful APIs. It provides a user-friendly interface to send HTTP requests, validate responses, and perform assertions on API endpoints.
Why Automate Jira Ticket Creation?
Manual Ticket creation can be a time-consuming and error-prone task, while dealing with a large number of tickets or repetitive tasks, using RestAssured we can eliminate missed logging bugs, and human error, also improve efficiency and ensure consistent ticket creation.
Set Up the Environment
To create Jira Tickets using RestAssured, you have to set up the following components in your environment.
- You have to Install Java Development Kit(JDK) in your system.
- After Installation We have to add the RestAssured library to your project dependencies in the POM.
- You have to Install the Jira Application and create an account and set a username and Password.
- You have to access Jira Instance with the necessary permissions
Authenticating with Jira Rest API
To Interaction with Jira API, authentication must be required. Jira supports various authentication methods like basic authentication and OAuth. In this blog, we are using basic authentication so we need a Jira username and password. Add your Jira username and password in the given below code.
// Set up basic authentication

PreemptiveBasicAuthScheme basicAuth = new PreemptiveBasicAuthScheme();

basicAuth.setUserName(“jiraUsername”);

basicAuth.setPassword(“jiraPassword”);

RestAssured.authentication = basicAuth ;
Note:
- PreemptiveBasicAuthScheme is a class that provides support for basic authentication in RestAssured.
- basicAuth.setUserName(jiraUsername): It helps to set the username for basic authentication by using the setUserName method of the basicAuth object.
- basicAuth.setPassword(jiraPassword): It helps to set the password for basic authentication by using the setPassword method of the basicAuth object.
- RestAssured.authentication = basicAuth: It helps to set the authentication scheme to be used by RestAssured. It assigns the basicAuth object to the authentication property of the RestAssured class.
Good to Read:- How to do API Testing Using Rest Assured?
How to Create the Jira Ticket Payload?
Ticket creation requests require a project key, Issue type, summary, and description. We can create a JSON payload representing the ticket details. In the given below payload replace the key value with your actual Project key and you can add name value as Bug, Improvement, Tasks, epic, etc what type of ticket you want to create.
String jiraPayload = "{\n" +

" \"fields\": {\n" +

" \"project\": {\n" +

" \"key\": \"projectKey\"\n" +

" },\n" +

" \" summary\": \"Sample Bug Creation: This is not Working as Expected\",\n" +

" \"description\": \"Sample Bug Ticket creation using RestAssured API\",\n" +

" \"issuetype\": {\n" +

" \"name\": \"Bug\"\n" +

" }\n" +

" }\n" +

"}";
Add Project Key
Note: For adding Project Key just follow given below points:
- Open your Jira Account
- Expand Projects
- You can observe Key Name is written along with the project Name
In the screenshot ‘NEW’ is the KeyName of the NewDemo Project.

Sending the POST Request
Once we have set up authentication and ready a JSON payload, we can send a POST request to the Jira API to create the ticket. You can follow the given code below.
// Send a POST request to create the ticket
Response response = RestAssured.given().contentType(ContentType.JSON).body(jiraPayload).post(“jiraUrl”);
Note: Response response = RestAssured.given() – It helps to send a POST request to the Jira API’s issue endpoint using RestAssured. The given() method initializes the request specification, and the post(“jiraUrl”) sends the actual request. The response is stored in the response variable of type Response.
Handling the Response
After sending the POST request, we need to handle the response from the Jira API. RestAssured provides convenient methods to extract information from the response, such as the HTTP status code, response body, and specific fields returned by the API.
// Extract the response details

int statusCode = response.getStatusCode();

String responseBody = response.getBody().asPrettyString();
Note:
- int statusCode = response.getStatusCode(): It retrieves the status code from the response using the getStatusCode() method of the response object. It stores the status code in the statusCode variable of type int.
- String responseBody = response.getBody().asPrettyString(): It retrieves the response body as a pretty formatted body using the getBody().asPrettyString() method. It stores the response body in the responseBody variable of type String.
Good to Read:- How To Learn About API testing with REST Assured
How to Create a Ticket in Jira Account?
Here is the whole code to create the Jira Ticket Using Rest Assured
import org.testng.annotations.Test;

import io.restassured.RestAssured;

import io.restassured.authentication.PreemptiveBasicAuthScheme;

import io.restassured.http.ContentType;

import io.restassured.response.Response;


public class CreateTicketInJira {

          @Test()

          public void createJiraIssue() {

                    // Jira API endpoint

                    String jiraUrl = "https://yourJiraInstance/rest/api/2/issue/";

                    // Set up basic authentication

                    PreemptiveBasicAuthScheme basicAuth = new PreemptiveBasicAuthScheme();

                    basicAuth.setUserName("jiraUsername");

                    basicAuth.setPassword("jiraPassword");

          RestAssured.authentication = basicAuth;

                    // Create JSON payload for the new ticket

                    String jiraPayload = "{\n" + " \" fields\": {\n" + " \" project\": {\n" + " \" key\": \"projectKey\"\n" + " },\n" + " \"summary\": \"Sample Bug Creation: This is not Working as Expected\",\n" + " \" description\": \"Sample Bug Ticket creation using RestAssured API.\",\n" + " \"issuetype\": {\n" + " \" name\": \"Bug\"\n" + " }\n" + " }\n" + "}";


                    // Send a POST request to create the ticket

                    Response response = RestAssured.given().contentType(ContentType.JSON).body(jiraPayload ).post(jiraUrl);

                    // Extract the response details

                    int statusCode = response.getStatusCode();

                    String responseBody = response.getBody().asPrettyString();

                    // Print the response details

                    System.out.println("Response Status Code: " + statusCode);

                    System.out.println("Response Body: " + responseBody);

          }
}
After hitting the API successfully, you will get a 201 status code in the Response
Output:
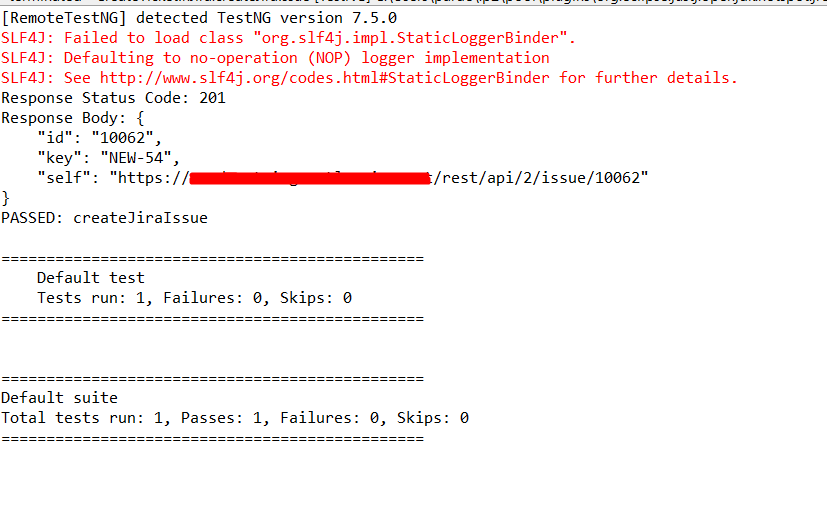
You can see the Unique Bug ticket key [NEW-54] is created with Summary and Description in your Jira account.

Conclusion
Automating Jira ticket creation using RestAssured offers significant benefits in terms of efficiency and streamlined project management. By leveraging the Jira REST API and RestAssured’s capabilities, developers/testers can save time, reduce errors, and enhance collaboration.